By Girish Radhakrishnan
Inverters saved us from short term power cuts at home, industries and emergency rooms. The quality of power of delivered by inverters vary depending on what kind of inverter is used. Inverters are classified into three types: square wave, modified sine wave and pure sine wave inverters.
A square wave inverter has poor quality output and contains lot of harmonic noise which may not suitable for many electronic gadgets. Its wave form goes up and down peak. But, resistive loads such as incandescent bulbs, heater and some devices which employees SMPS don’t exhibit problem with square wave inverters.
A modified sine wave or modified square wave to be precise can run most of the electronic gadgets without much issue.
The wave form goes peak up and come down to zero volt and stays for some interval and goes negative peak and come back to zero volt and cycle repeats. It has harmonic noise but not as bad as square wave and can be filtered easily. This design is used in most of the inexpensive inverters.
A pure sine wave inverter has most sophisticated design and expensive one. It can run all electronic devices including inductive loads such as motors which have problems in operating with other mentioned designs. It has no harmonics and wave form is smooth sinusoidal.
By now you know the basic difference between sine, modified sine and square wave inverters.
In this project we are constructing an inverter which can deliver output equivalent to sine wave inverter.
The circuit can be understood better by given block diagram below:
The proposed design consists of an Arduino which generates 50Hz constant square wave. An IC 555 chopper circuit generates high frequency pulse.
The actual chopping of these two signals is done by IC 7408, which is AND gate. The mixed signal is fed to gate of MOSFET. The frequency of IC 555 can be varied for adjusting the output voltage by tuning the variable resistor.
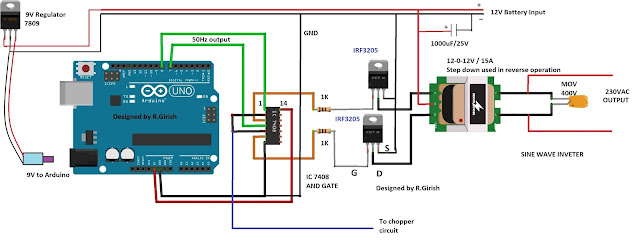
Circuit Diagram:
The constant 50Hz square wave is generated across pin #7 and pin #8 of Arduino. This flip-flop signal is fed to pin #1 and pin #4 of IC 7408. These two pins are of two different AND gates.
The high frequency chopping signal is fed to pin #2 and #5. The AND gate allows only when two inputs are high, since the Arduino frequency output is lower and IC555 higher, we get chopped signal at the corresponding gate output.
The chopped output is fed to MOSFET with a current limiting resistor for limiting the gate capacitor charging rate. A 12V 15A or higher rated transformer can be used if you need higher wattage output.
A 400V metal oxide varistor is utilized across the output for suppressing initial high voltage surge while turning on the inverter; it could be several hundreds of volts in magnitude.
A 9V regulator is used for arduino as constant voltage source. A 1000uF or higher capacitance can be used at battery input for smooth starting and to protect the inverter from sudden voltage fluctuations.
Chopper circuit:
The chopper circuit is simple variable frequency generator, and the circuit is self-explanatory.
Now let’s see how well the frequency from Arduino is chopped by high frequency generator circuit to achieve sine wave equivalent.
The above simulation describes the output from arduino. It’s a simple and stable 50Hz signal.
The above simulation shows the wave form after chopping the constant 50Hz signal. The width of the chopping ratio can be adjusted by tuning the variable resistor and which also determine the output voltage.
The above chopped signal may not look like sine wave. A real sine wave inverter’s chopped wave form increase and decrease exponentially across x-axis. But begin a simple design the chopping frequency stay constant and good enough to run most of electronic gadgets.
Program for Arduino:
//-------------Program developed by R.Girish-----------//
int out1 = 8;
int out2 = 7;
void setup()
{
pinMode(out1,OUTPUT);
pinMode(out2,OUTPUT);
}
void loop()
{
digitalWrite(out2,LOW);
digitalWrite(out1,HIGH);
delay(20);
digitalWrite(out1,LOW);
digitalWrite(out2,HIGH);
delay(20);
}
//-------------Program developed by R.Girish----------//


0 Response to "Simple Arduino Sine Wave Inverter Circuit"
Post a Comment